Unleash the Power: Excel Automation in UiPath Studio with Practical Examples
Microsoft Excel is a cornerstone of data analysis and manipulation. But what if you could automate those tedious, repetitive tasks you do on a regular basis? Let me introduce you to UiPath Studio – a powerful Robotic Process Automation (RPA) tool that seamlessly integrates with Excel, allowing you to streamline your workflow and free up valuable time.
Why Automate Excel Tasks with UiPath Studio?
Manual data processing in Excel can be time-consuming and error-prone. UiPath Studio allows you to automate these procedures, increasing accuracy and efficiency. Here’s why it’s so advantageous:
• Automate repetitive tasks to reduce errors and improve accuracy.
• Boost productivity by focusing on high-value activities instead of tedious tasks.
• Improved accuracy with UiPath Studio’s consistent and dependable data processing.
• Improved Scalability: Automate workflows for huge datasets.
Practical examples to help you get started.
Let’s look at some actual instances of automating operations in Excel using UiPath Studio.
To get the Excel files, click the get button.
Here are the actions to take:
1. Start by opening UiPath Studio and creating a new process with a name and description.
Name: Excel Automation.
Description: Use Excel Activities to compute EMIs and total interest.
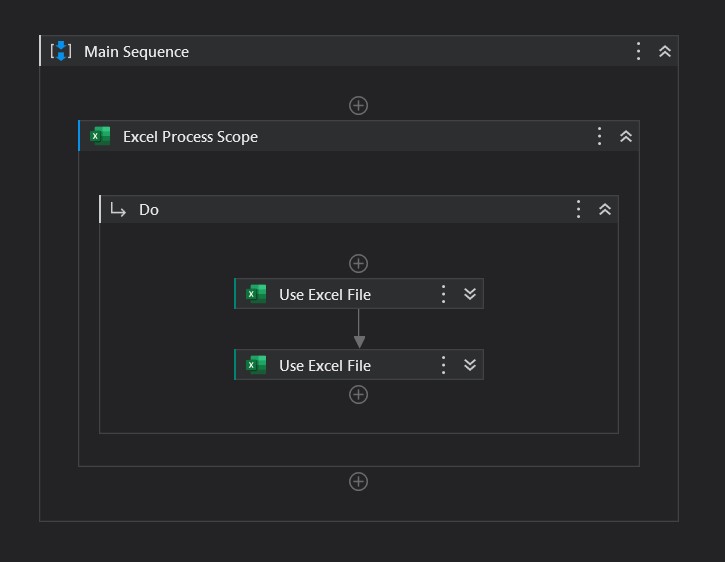
2. Use the Excel Process Scope and the Use Excel File to read data from the Details.xlsx file. Enter the Excel file path in the activity. In the “do” section, select the Read Range and type Excel.Sheet(“EMI”) into the Range. Use CTRL+K to create a variable named dt_EMIDetail.
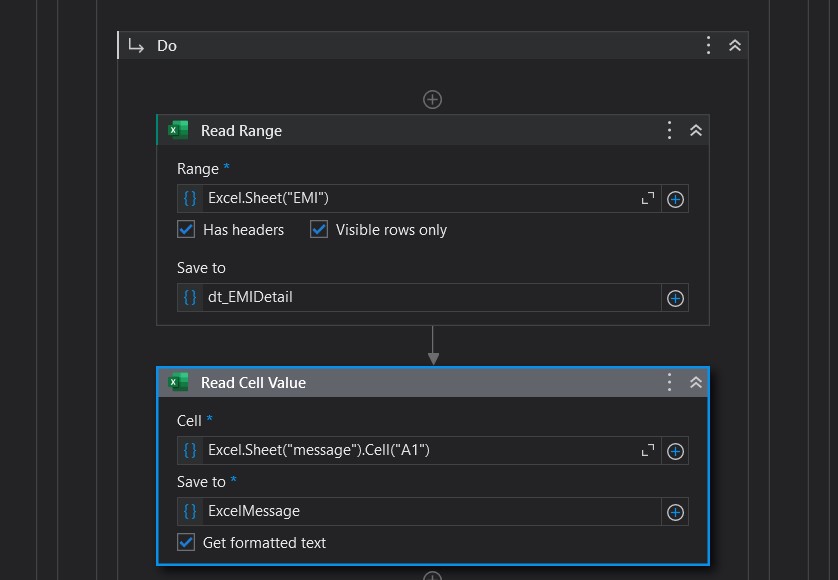
3. Following the Read Range, utilize the Read Cell Value Activity to obtain the message cell value. Insert Excel.Sheet(“message”).Cell(“A1”) in Cell and set the ExcelMessage variable to Save to.
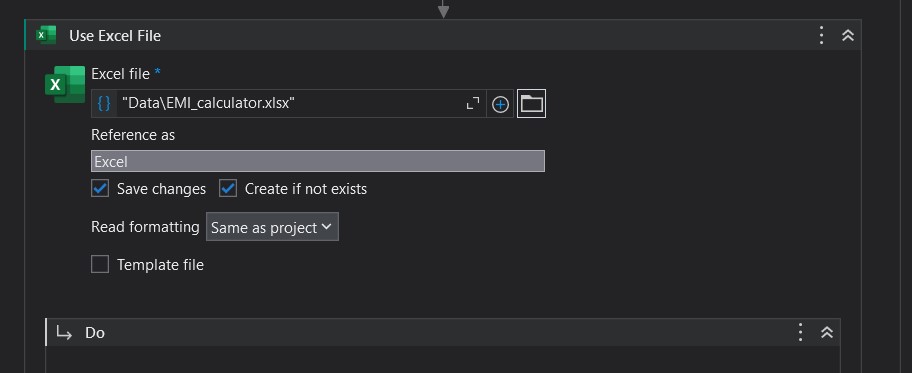
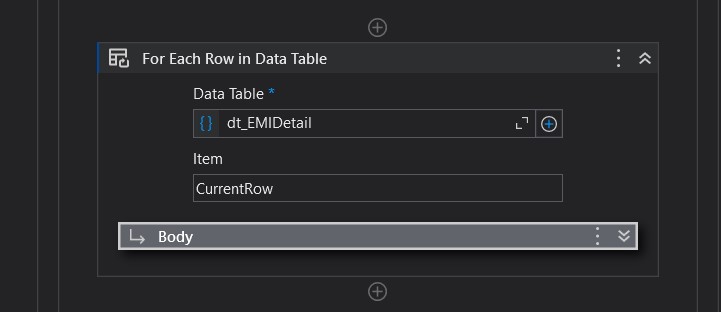
4. To access the EMI_calculator.xlsx file, open another Use Excel file that is not inside the scope of the previous Use Excel file. Enter the Excel file path in the activity. In the “do” section, select For Each Row in Data Table and enter dt_EMIDetail into the Data Table field.
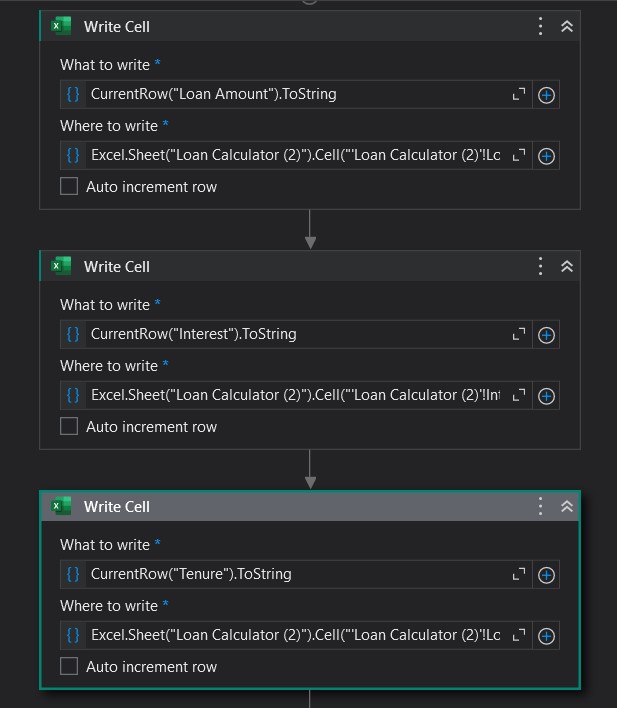
5. Within the For Each scope, utilize three Write Cell activities with the following parameters:
a. Write Cell 1:
– What to Write: CurrentRow(“Loan Amount”).ToString
– Where to Write: Excel.Sheet(“Loan Calculator (2)”).Cell(“‘Loan Calculator (2)’!Loan_Amount”)
b. Write Cell 2:
– What to Write: CurrentRow(“Interest”).ToString
– Where to Write: Excel.Sheet(“Loan Calculator (2)”).Cell(“‘Loan Calculator (2)’!Interest_Rate”)
c. Write Cell 3:
– What to Write: CurrentRow(“Tenure”).ToString
– Where to Write: Excel.Sheet(“Loan Calculator (2)”).Cell(“‘Loan Calculator (2)’!Loan_Months”)
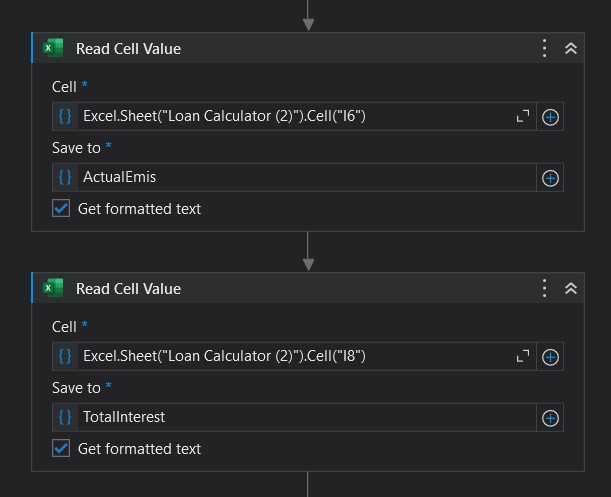
6. Following the Last Write Cell, perform two Read Cell actions with the following details:
a. Read Cell Value 1:
– Cell: Excel.Sheet(“Loan Calculator (2)”).Cell(“I6”)
– Save to: ActualEmis (Variable)
b. Read Cell Value 2:
– Cell: Excel.Sheet(“Loan Calculator (2)”).Cell(“I8”)
– Save to: TotalInterest
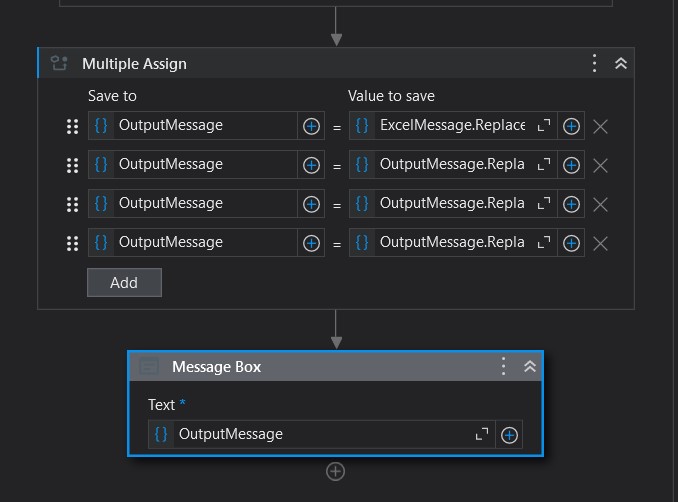
7. Use Multiple Assign After Activity with the following parameters:
- OutputMessage = ExcelMessage.Replace(“{LoanAmount}”, CurrentRow(“Loan Amount”).ToString)
- OutputMessage = OutputMessage.Replace(“{EMI}”, ActualEmis)
- OutputMessage = OutputMessage.Replace(“{interest}”, TotalInterest)
- OutputMessage = OutputMessage.Replace(“Hello”, “Hello +CurrentRow(“Username”).ToString)
8. Finally, use the Message Box Activity to view the results.
These are just example – UiPath Studio’s capabilities extend far beyond these. With a bit of exploration, you can unlock a world of possibilities for automating your Excel workflows.
Empower Yourself with UiPath Studio
UiPath Studio empowers you to transform the way you work with Excel. By automating repetitive tasks, you can achieve greater efficiency, accuracy, and productivity. Take the first step towards a smarter and more automated future – explore UiPath Studio today!
Click here for Documentation

